Repairs other than the replacement of gasket, body handles, safety valve and the vent weight must be done only by
an Authorised Service Centre/representative. All replacement parts must be genuine Hawkins/Futura parts.
In case you have to replace certain Hawkins or Miss Mary pressure cooker parts yourself,
you will find the notes below helpful.
|
Gasket Replacement
If leakage develops along the rim of the cooker body which is not due to the misalignment of the lid or a dent on the rim or lid curl, the gasket needs to be replaced. This is simply done by changing it with a replacement genuine Hawkins gasket to fit the size of your Hawkins.
Safety Valve Replacement
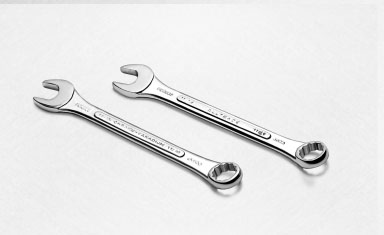
1. Get a genuine Hawkins safety valve.
|

|
|
2. One or possibly two 19 mm/3/4 inch spanners (wrenches) are required to replace the safety valve – one for turning the nut on the top of the lid and, if required, one for holding the retainer on the underside of the lid.
3. One strong person can replace the safety valve as stated alongside.
TO REMOVE
1. Remove the gasket and vent weight from the lid.
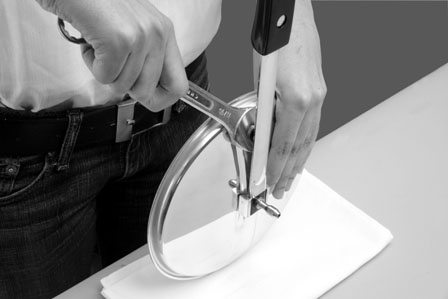
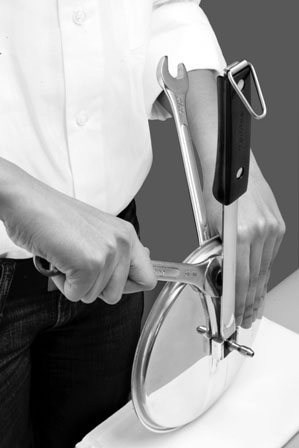
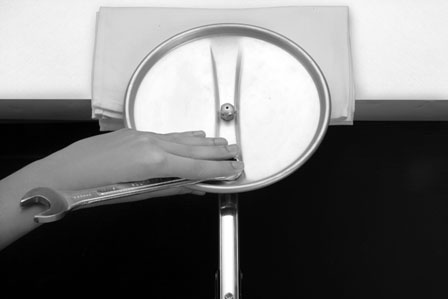
2. Hold and brace the lid on a soft surface such as a folded cloth with the left hand. Take care not to bend or warp the lid curl. Do not hold the lid by the handle. With the right hand, place the spanner around the nut on the top of the lid under the handle bar (see
Picture 1). Exert downward pressure counter-clockwise on the nut until valve loosens. If valve is too tight, soak lid in hot water for thirty minutes and wipe dry.
Picture 1
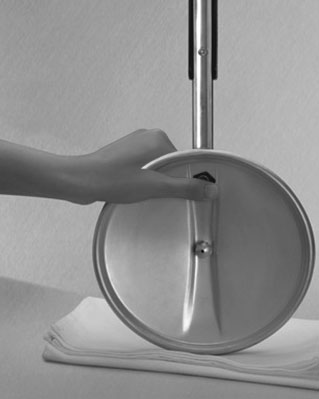
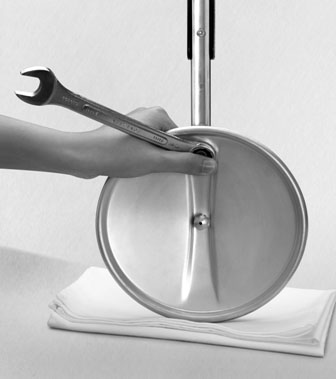
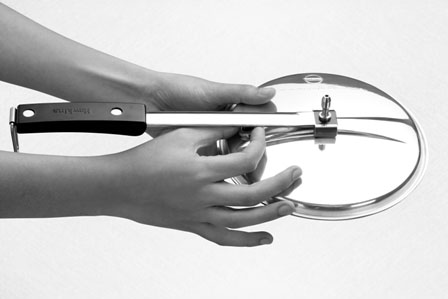
3. Grip lid as shown (see Picture 2). Hold retainer firmly in one place with the thumb of the left hand while grasping the lid with the same hand. (If required, cover the retainer with a cloth to protect thumb). With the right hand, place the spanner around the nut on top of the lid. Exert downward pressure on the nut (see Picture 3). Remove and re-apply spanner at a higher angle to the nut. Repeat procedure until the nut can be unscrewed with fingers. Remove nut, retainer and washer. Discard all parts do not reuse any part.
|
Picture 2
|

Picture 3
|
If you are unable to unscrew the safety valve, use a second spanner to hold the retainer and remove the safety valve as follows:
4. Place the ring end of one spanner on the retainer on the underside of the lid and hold it in place with the thumb of the left hand while grasping the lid with the same hand (see Picture 4). With the right hand, place the other spanner around the nut on the top of the lid (see Picture 5). Exert downward pressure on the nut. Remove and re-apply spanner on the nut at a higher angle. Repeat downward pressure. Repeat procedure until the nut can be unscrewed from the retainer with fingers. Remove nut, retainer and washer. Discard all parts do not reuse any part.
|
Picture 4
|
Picture 5
|
TO REPLACE
1. Clean all surfaces around the lid hole where the safety valve will sit and wipe dry.
2. Unscrew the new nut from the retainer (which is fitted with silicone washer) and keep them to one side.
|
|
|
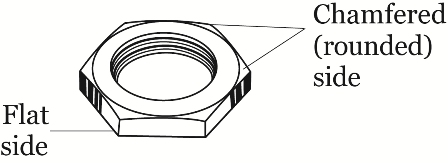
3. Push retainer with silicone washer into the safety valve hole from the underside of the lid and hold in place with the left hand. Place the nut chamfered side down, flat side up around retainer threads on top surface of lid and screw nut in a clockwise direction with your fingers until tight (see Picture 6).
Picture 6
4. Hold the lid verically and grip with your left hand. The top of the lid should be facing you. Hold retainer on underside of lid firmly in place with one or two fingers of left hand (If required, cover the retainer with a cloth to protect fingers). With the right hand, place the spanner around the nut on the top of the lid at an upward angle and exert downward pressure on the spanner (see Picture 7). Repeat; tighten nut securely until it stops moving. Do not over-tighten the threads may break.

Picture 7
If you are unable to tighten the nut, use a second spanner to hold the retainer and tighten the nut as follows:
5. Hold the lid handle in your right hand and turn the lid upside down, that is, with the underside of the lid facing you and the top side of the lid lying flat on the soft, folded cloth on a table. With the left hand, position the ring end of one spanner around the retainer on the underside of the lid and hold it in place with the fingers of the left hand while grasping the lid with the same hand (see Picture 8).
Picture 8
6. Raise the lid vertically holding the lid with your left hand with the ring spanner in place on the retainer (to stop its rotation when you tighten the nut). Now the underneath of the lid will be away from you and the top of the lid will be facing you. With the right hand, position the second spanner around the nut on top of the lid at an upward angle and exert downward pressure on the spanner (see Picture 9). Repeat; tighten nut securely by repeating the downward strokes of the spanner until the nut stops moving. Do not over-tighten the threads may break.
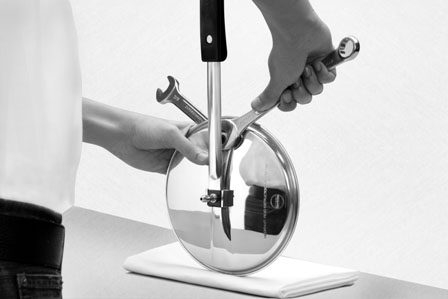
Picture 9
Replacement of Plastic Handles
The subsidiary body handle and the body handle are replaceable by unscrewing the existing handle and screwing on the replacement handle with a screwdriver. For the body handle: place the two halves of plastic body handle on either side of the metal bracket. Join them together, insert studs and tighten the screws into studs from the opposite side.
If the subsidiary or the body handle is difficult to unscrew, a second person holding the cooker body firmly while one person turns the handle screws anti-clockwise will make it easier.
|
Sealing Ring Replacement
If leakage develops along the rim of the cooker body which is not
due to the misalignment of the lid or a dent on the rim or lid curl, the
sealing ring needs to be replaced. This is simply done by changing it
with a replacement genuine Futura sealing ring to fit the size of your
Futura.
Safety Valve Replacement
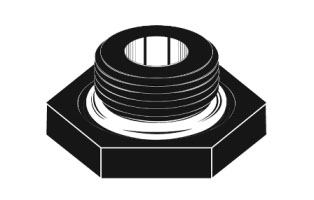
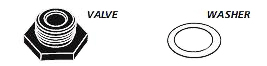
1. Get a genuine Futura safety valve. The two parts of the safety valve are:
|
|
2. The ring end of a 19 mm/3/4 inch offset spanner/wrench or the ring
or open end of a 19 mm/3/4 inch spanner is recommended to replace
the safety valve.
3. A food compatible glue is recommended.
4. Remove the pressure regulator from lid.
|
TO REMOVE
With one hand, hold and brace the lid upside down on a soft surface
such as a folded kitchen cloth or a rubber mat. Take care not to bend
or warp the lid curl. Do not hold the lid by the handle. With the
other hand, place a spanner on the used safety valve and unscrew
the safety valve in the direction (anti-clockwise) shown by the two
arrows marked on the safety valve. Remove safety valve and washer. Discard;
do not reuse either part.
|
TO REPLACE
1. Clean and dry the area (called the safety valve body) from which the used safety valve was unscrewed
and into which the replacement safety valve will be screwed.
2. Place the replacement washer over the replacement safety valve as shown below.
|
|
3. Hold the valve with the washer on it as shown above and apply a
small amount of food compatible glue on the valve threads. Holding the safety valve with the
threads pointing into the safety valve body, screw the valve (with washer)
clockwise into the safety valve body. Tighten clockwise with spanner.
|
|
|
Replacement of Plastic Handles
The short body handle, the long body handle and the lid handle are
all replaceable by unscrewing the existing handle and screwing on a
replacement handle. Clean any accumulated dirt from the area before
attaching the new handle.
If the long body handle or the short body handle is difficult to
unscrew, a second person holding the cooker body firmly while one
person turns the handle screw anti-clockwise will make it easier.
For most sizes of the Futura Pressure Cooker, the plastic handles
need a nut and screw to be fixed. The nut and screw come with the
plastic handles.
|
|
|
REPLACING THE LONG BODY HANDLE
|
REPLACING THE SHORT BODY HANDLE
|
|
|
|
In the case of each of the body handles for all sizes of Futura (except
the 2 Litre, 3 Litre and the hard anodised 4 Litre), the nut has to be
placed between the bracket and the body of the cooker. Then the plastic
handle should be put in place and screwed tight.
|
|
|
PLACING THE NUT FOR THE LONG HANDLE
|
PLACING THE NUT FOR THE SHORT HANDLE
|
|
|
|
There is no nut for the 2 Litre, 3 Litre and the hard anodised 4 Litre
Futura pressure cooker body handles; attach each handle directly into
the bracket with the screw.
Before unscrewing the lid handle, remove the pressure regulator
and put the lid on a soft surface such as a soft cloth to avoid damaging
the lid and metal handle. Unscrew the screws holding the old handle.
Place the new handle in position and screw it on. The lid handle is
screwed on directly into the metal threads molded into the plastic handle.
The screw towards the end of the handle also holds the latch.
|
|
|
REPLACING THE LID HANDLE
|
SCREW WHICH HOLDS LATCH AND HANDLE
|
|
|